一、首先为什么是这个组合?
- 回归写作:Markdown 专注写作,obsidian 是一个值得去一直使用的好编辑器,该有的功能都有,丰富的插件系统,md 文件格式基本上所有的平台都能很优美的支持。尤其是我经常有写 md 或者 json 格式的 prompt 需求;
- 数据沉淀:未来的 AI 时代,是数据无价的时代,沉淀自己的内容和数据越来越重要。Obsidian 的所有数据均为本地 md 文件,对比各种印象笔记、notion 等,更为方便存储和使用;多端同步和远程存储可以选择官方,也可以像我一样折腾到 GitHub;
- 知识传播:vercel + hugo + paperMod 这一套组合拳非常方便部署
二、相关工具汇总
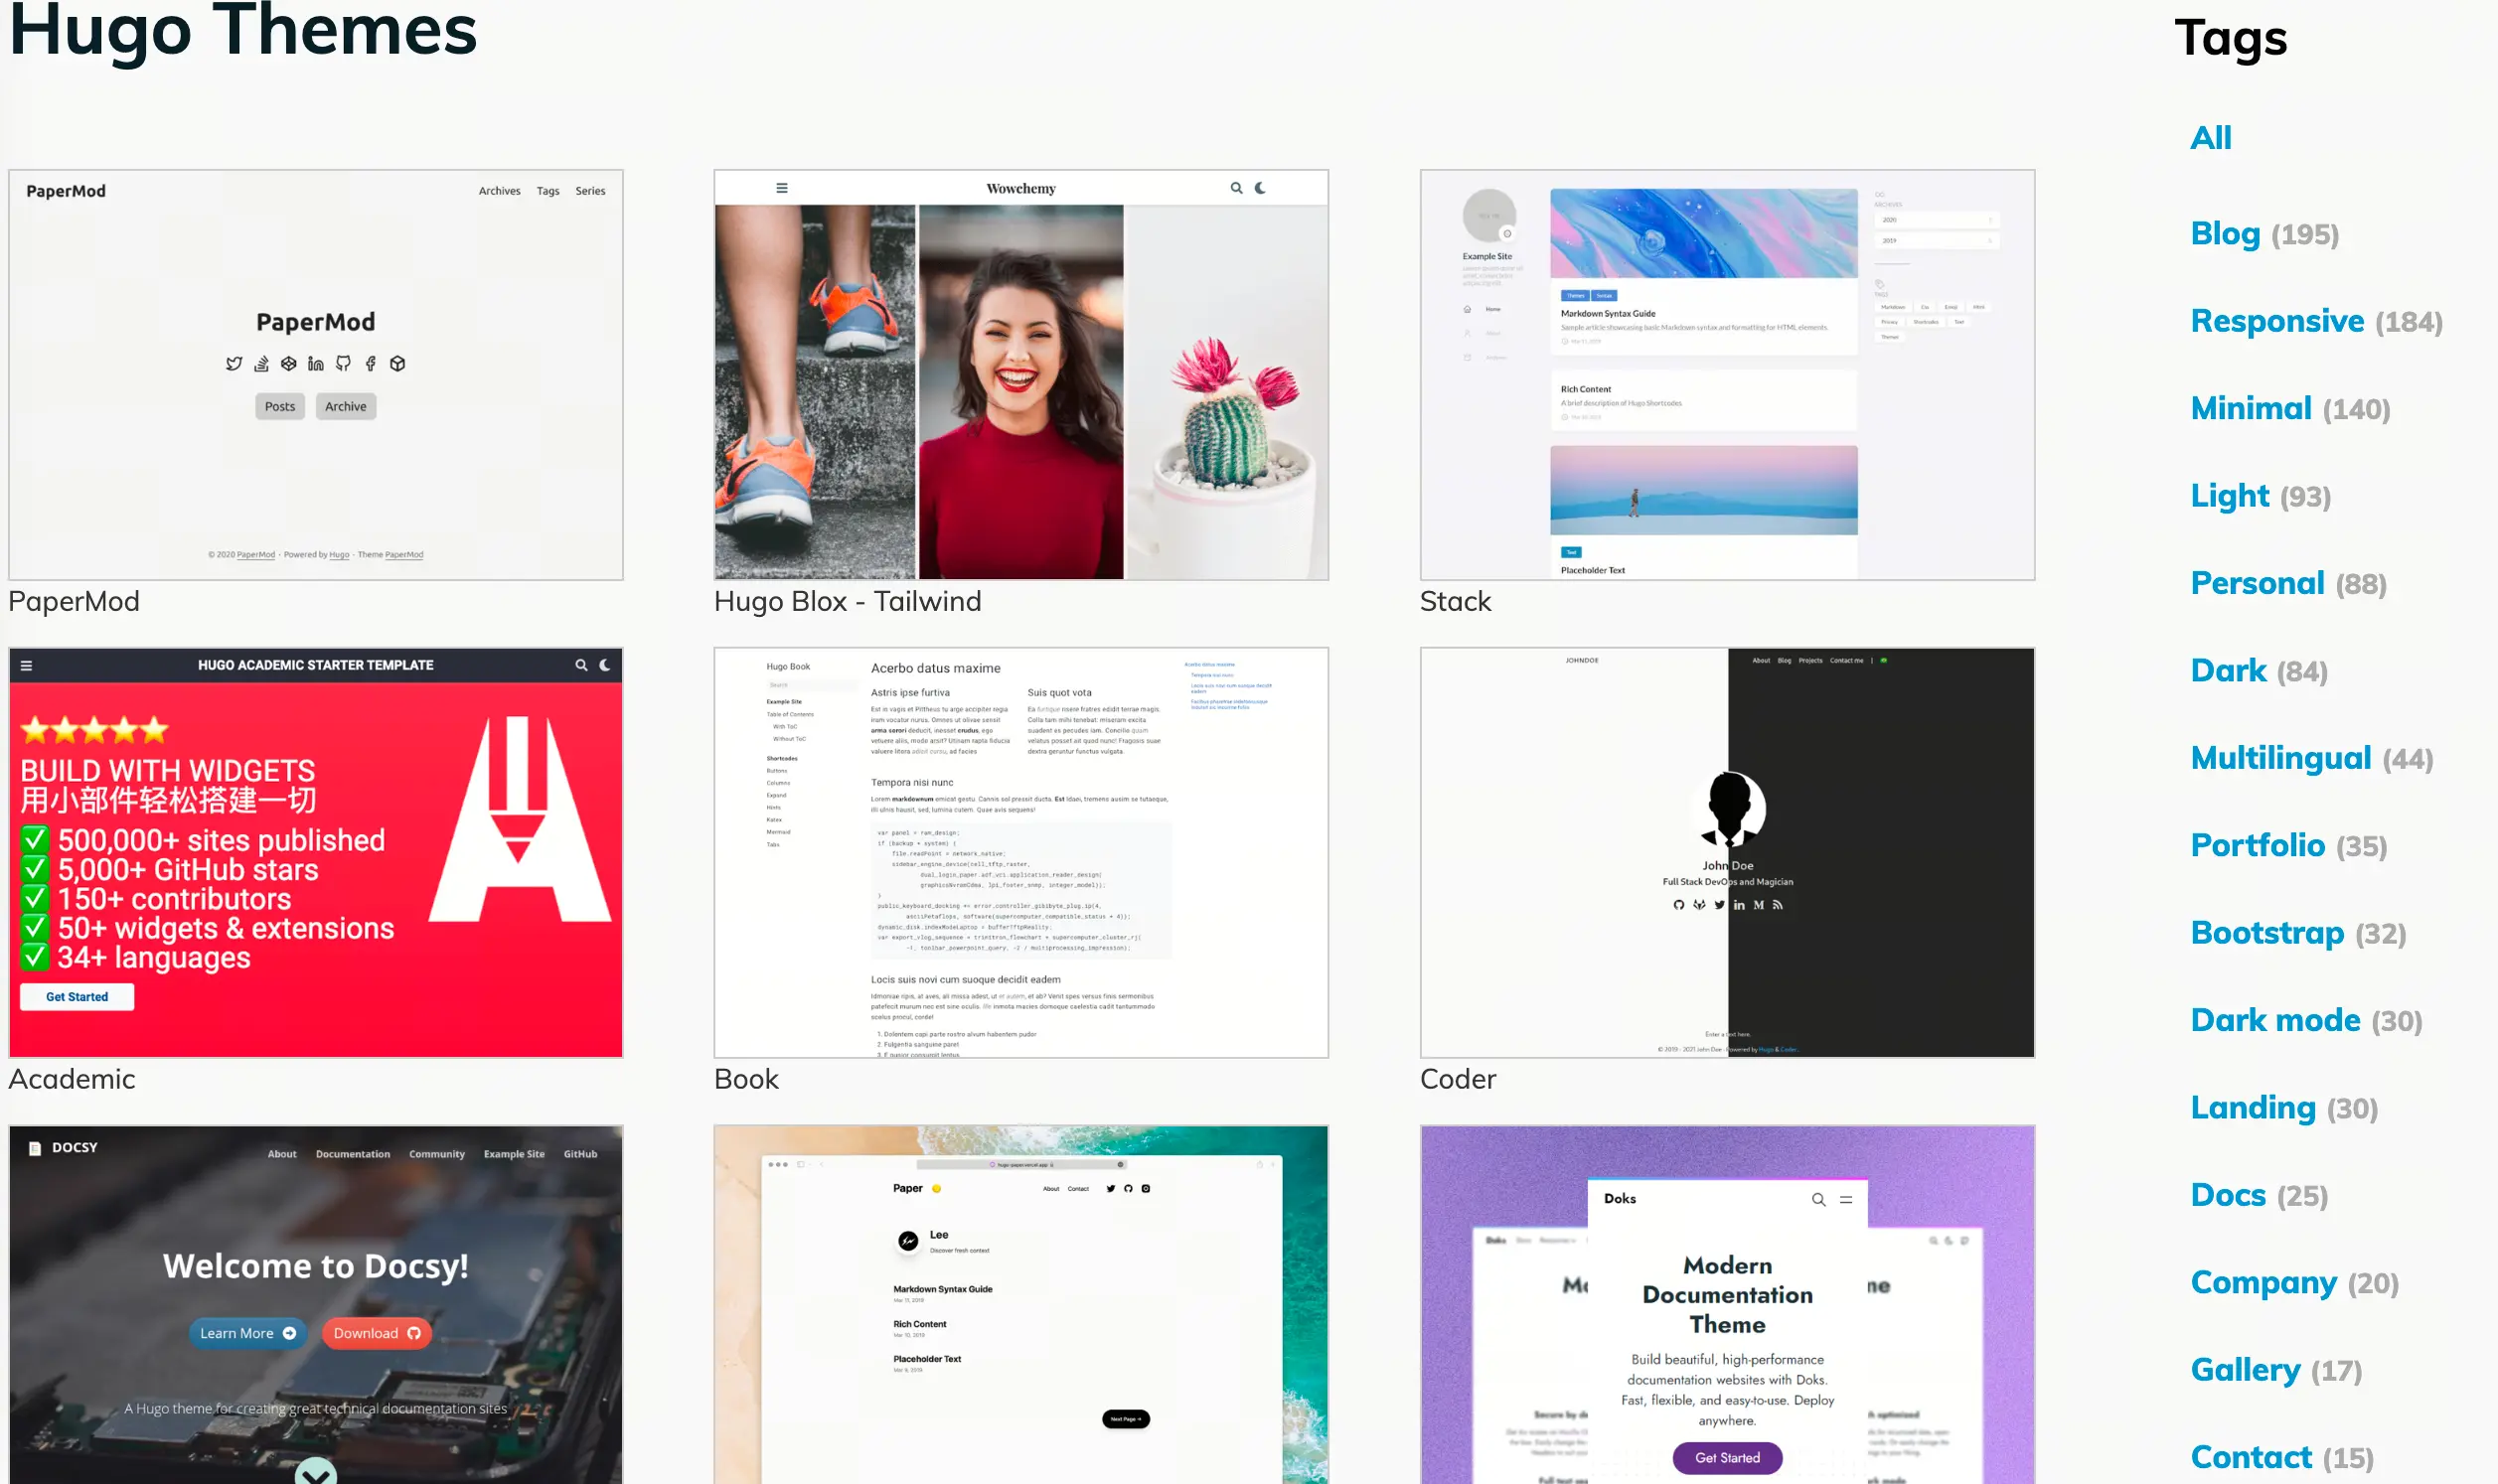
- Hugo + Paper Mod 主题 (主题很多,自己点菜,完全满足做博客或者门户网站等)
- Obsidian 编辑器 + Github Publisher 插件 (改名了现在叫 Enveloppe) + Image Converter 插件
- Github + Vercel (老搭档了,对比 GitHub page 自由度更高更方便)
- dynadot.com (我用来购买 AI 域名,性价比较高而且可选中文界面&中文客服,服务相当周到。有一次出价点错了,跟客服说明之后,友好的帮我立刻取消了出价。我的推荐码:
kW6Z6i9D8e6I9T创建 Dynadot 帐户并在 48 小时内消费 9.99$ 会返还给你 5$,聊胜于无吧)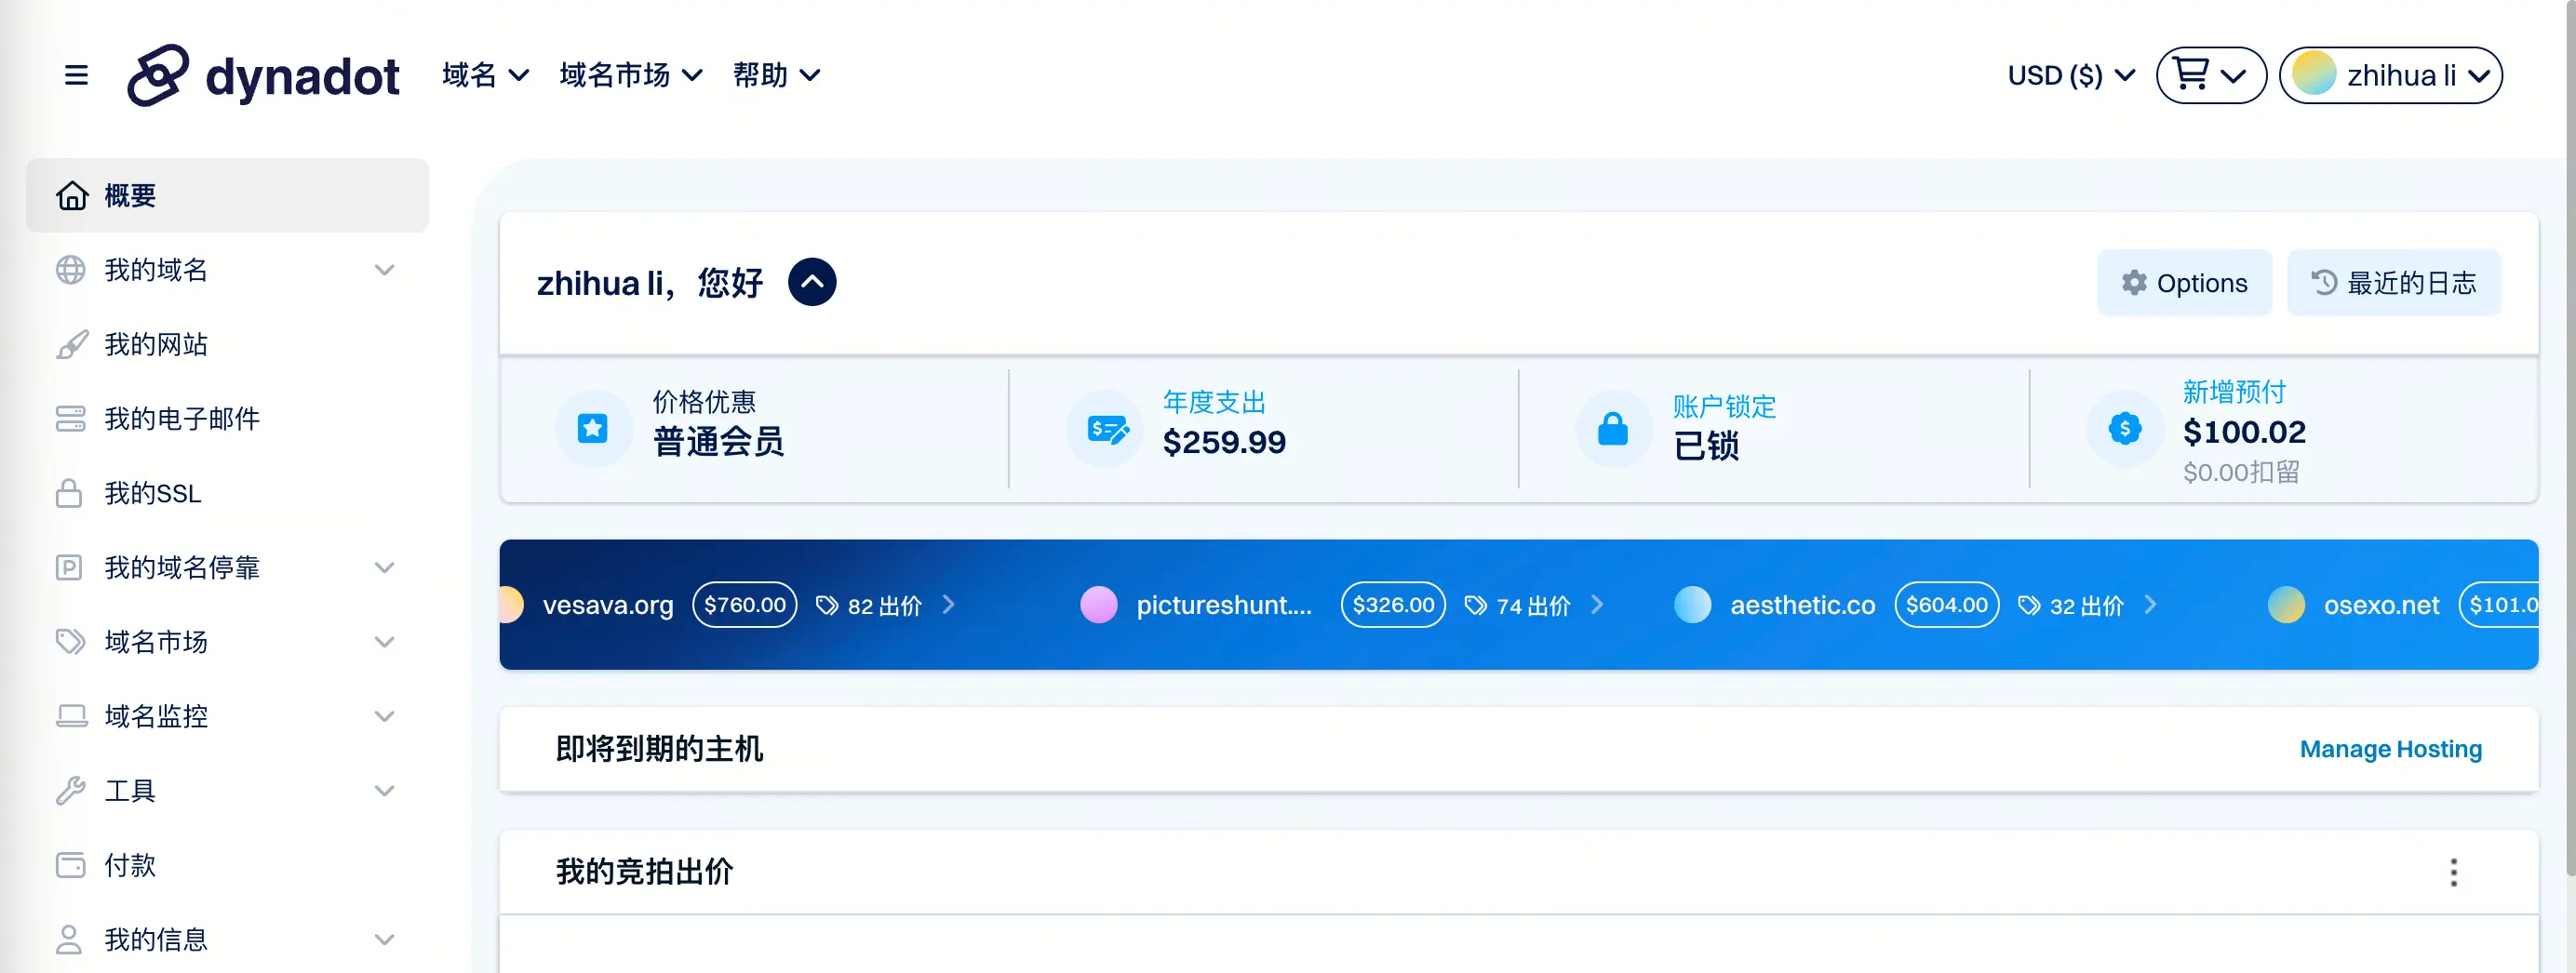
三、流程步骤
1. Hugo + PaperMod
- 使用我的仓库 fork 直接部署:
- hellloveyy/obsidian-GbyAi fork 自老苗,去掉了他自己的文章和关联的图片,下面 PaperMod 已经被引用到这个项目的子模块了,请看根目录文件
.gitmodules - hellloveyy/hugo-PaperMod 稍微改了点官方主题,添加了首页图&标签云
git clone XX你自己的项目XX && git submodule update --init && brew install hugo && hugo server- 至此你本地已经有了一个网站
http://localhost:1313/ - 记得如果你也自己改动了原模板,那么
.gitmodules这个文件里面的你的项目的引用需要使用 http!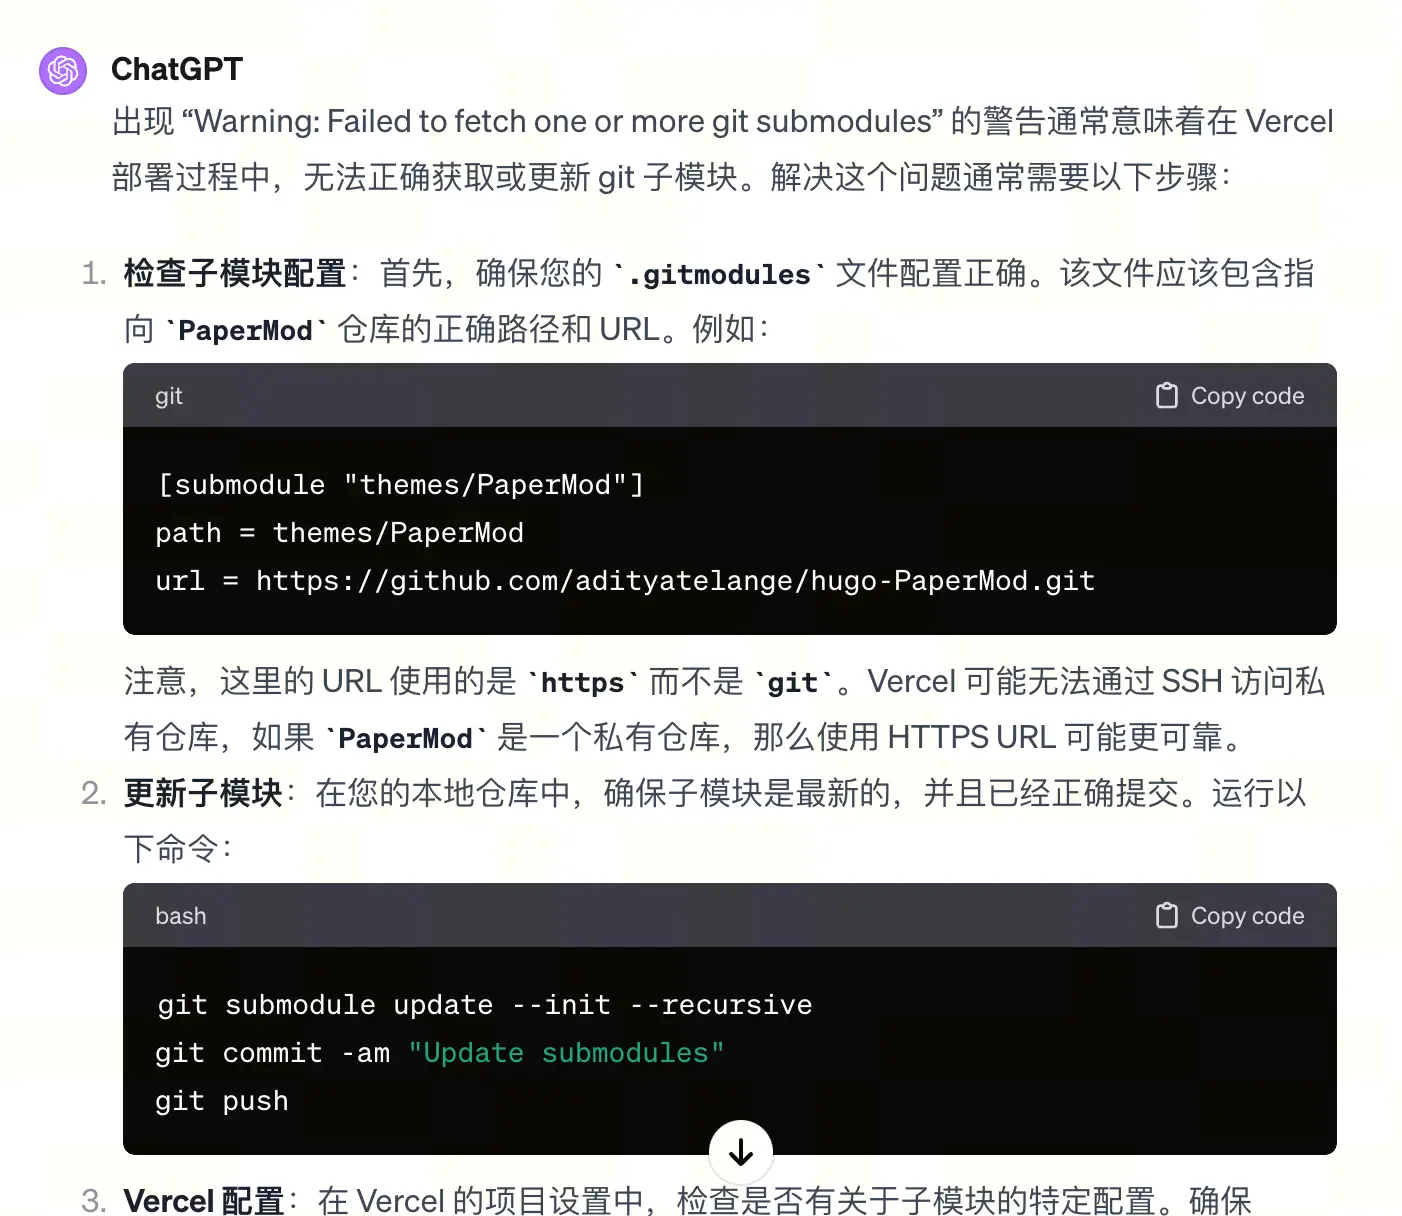
- hellloveyy/obsidian-GbyAi fork 自老苗,去掉了他自己的文章和关联的图片,下面 PaperMod 已经被引用到这个项目的子模块了,请看根目录文件
- 使用 hugo 初始化一个网站
hugo init,自己选择好你喜欢的主题,并发布到 Github 上,这块具体怎么弄就不展开介绍了,和上面是类似的。- 可以参考:官方主题文档:PaperMod
- 所有 hugo 和 paperMOD 主题的配置项都在
config.yml,并且加注了详细的注释!
baseURL: " https://gby.ai/" #绑定的域名
title: GbyAI #网站标题
paginate: 10 #首页每页显示的文章数
theme: PaperMod #主题名称
languageCode: zh-cn #默认语言
ignoreErrors: ["error-remote-getjson"]  #yml or ignoreErrors = ["error-remote-getjson"]  #toml
enableRobotsTXT: true # 允许爬虫抓取到搜索引擎,建议 true

minify:
	disableXML: true
	minifyOutput: true

# 网页下方copyright说明
copyright: Content under license [CC BY-NC-SA 4.0](https://creativecommons.org/licenses/by-nc-sa/4.0/)

#搜索使用
outputs:
	home:
		- HTML
		- RSS
		- JSON # is necessary

params:
	env: production # to enable google analytics, opengraph, twitter-cards and schema.
	title: GbyAI
	description: "探索AIGC,了解深层的agent落地,探索prompt的实际应用,最新的AI方面消息传递"
	keywords: ["AIGC", "agent", "prompt", "news"]
	author: ["hellloveyy"]
	# images: ["<link or path of image for opengraph, twitter-cards>"]
	DateFormat: "2006-01-02"
	defaultTheme: auto # dark, light
	disableThemeToggle: false

	ShowReadingTime: false #是否展示阅读时间
	ShowShareButtons: false #是否展示评论和分享按钮
	# 支持分享的平台 X / facebook / reddit / telegram / whatsapp / ycombinator / linkedin
	#  ShareButtons:
	#    - x
	#    - telegram
	#    - email
	ShowPostNavLinks: true
	ShowBreadCrumbs: false #是否展示面包屑导航
	ShowCodeCopyButtons: true #代码是否展示copy按钮
	ShowWordCount: false #是否展示字数统计
	ShowRssButtonInSectionTermList: true #订阅按钮
	UseHugoToc: true
	ViewCount: false # 是否展示 uv、pv
	#  BaiduAnalytics: "" # 是否开启百度统计
	#googleAnalytics:  # 谷歌统计
	disableSpecial1stPost: false
	disableScrollToTop: false #滑动到顶部
	comments: false #评论展示
	hidemeta: false
	hideSummary: true
	hideDescription: true
	showtoc: true #显示目录
	tocopen: true #自动展开目录
	# 网站左上角的文字和图标配置
	label:
		text:
		iconSVG:

	assets:
		# disableHLJS: true # to disable highlight.js
		# disableFingerprinting: true
		favicon: "/favicon.ico"
		favicon16x16: "/favicon-16x16.png"
		favicon32x32: "/favicon-32x32.png"
		apple_touch_icon: "/apple-touch-icon.png"
		safari_pinned_tab: "/safari_pinned_tab.png"

	# profile-mode
	profileMode:
		enabled: false # needs to be explicitly set
		title: ExampleSite
		subtitle: "This is subtitle"
		imageUrl: "<img location>"
		imageWidth: 120
		imageHeight: 120
		imageTitle: my image
		buttons:
			- name: Posts
			  url: posts
			- name: Tags
			  url: tags

	# 网站介绍
	homeInfoParams:
		Title: "Hi! I'm hellloveyy \U0001F44B"
		Content: "一名全身心投入 AIGC 的学徒 - **[进一步了解我](/about)**"

	socialIcons:
		#     - name: wechat
		#       url: "https://www.beizigen.com/images/wechat.webp"
		- name: email
		  url: "mailto:hellloveyy@gmail.com"
		- name: github
		  url: "https://github.com/hellloveyy"
		- name: rss
		  url: "/index.xml"

	cover:
		hidden: true # hide everywhere but not in structured data
		hiddenInList: false # hide on list pages and home
		hiddenInSingle: true # hide on single page
		# 在列表默认显示的图片
		defaultImage: https://images.unsplash.com/photo-1594193316420-74562b321032?w=500&auto=format&fit=crop&q=60&ixlib=rb-4.0.3&ixid=M3wxMjA3fDB8MHxzZWFyY2h8MTZ8fGdyYWRpZW50JTIwYmxhY2t8ZW58MHwwfDB8fHwy

	editPost:
		URL: "https://github.com/hellloveyy/obsidian-GbyAi/tree/main/content"
		Text: "指出问题" # edit text
		appendFilePath: true # to append file path to Edit link

	# for search
	# https://fusejs.io/api/options.html
	fuseOpts:
		isCaseSensitive: false
		shouldSort: true
		location: 0
		distance: 1000
		threshold: 0.4
		minMatchCharLength: 0
		limit: 10 # refer: https://www.fusejs.io/api/methods.html#search
		keys: ["title", "permalink", "summary", "content", "tags"]

# 选择languages字段的哪个语言,默认 en
defaultContentLanguage: zh
languages:
	zh:
		permalinks:
			# 默认会带路径会带 /posts 前缀
			posts: /:slug/
		menu:
			main:
				- name: 🔍搜索
				  url: search
				  weight: 1
				- name: 📚文章
				  url: archives
				  weight: 2
				# - name: 标签
				#   url: tags
				#   weight: 2
				- name: 🧩系列
				  url: series
				  weight: 3
				- name: 🤝赞助
				  url: sponsor
				  weight: 4

# Read: https://github.com/adityatelange/hugo-PaperMod/wiki/FAQs#using-hugos-syntax-highlighter-chroma
# pygmentsUseClasses: true
markup:
	goldmark:
		extensions:
			# 禁用 Hugo 将英文单引号转为 &rsquo
			typographer: false
	# highlight:
	#   noClasses: false
	#   anchorLineNos: true
	# codeFences: true
	# guessSyntax: true
	# lineNos: true
	# style: monokai

taxonomies:
	tag: tags
	series: series
2. Github Publisher
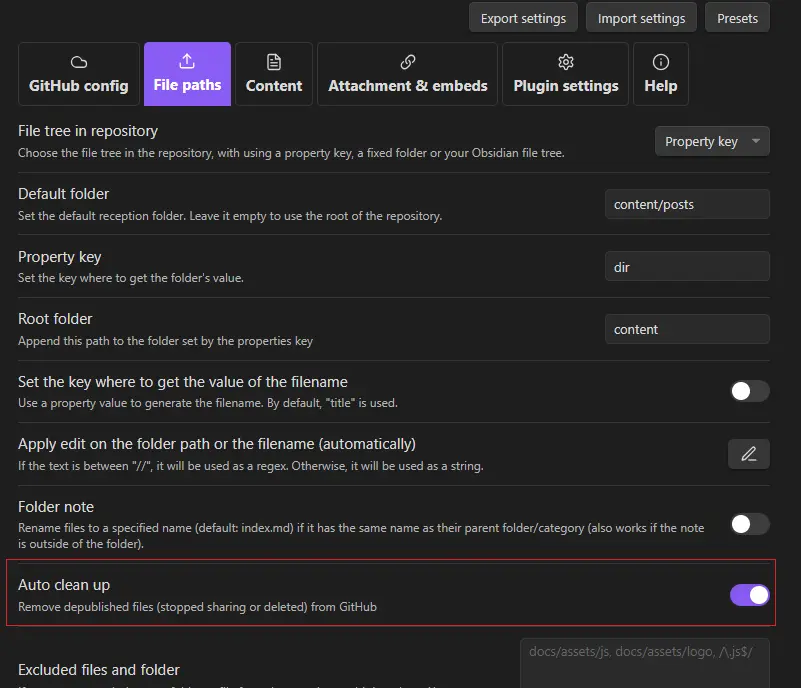
给 Obsidian 安装 Github Publisher 插件,该插件的作用是将 Obsidian 中的文章上传到 Github 仓库,上传前可以指定文件目录、自定义内容替换等操作。
我的配置如下,你可以导入配置 https://github.com/miaogaolin/obsidian-github-publisher-hugo/tree/main ,老苗的说明很详细了哈。
如果你对其它配置感兴趣,可以看看 Publisher官网文档。
Github config

注意:
- 生成的 token 不要随便放在 Github 的公共仓库,检测到 token 就会失效。
- 一定要点图中的链接去生成 token !
- 如果某一篇文章误点 share 到首页了,可以取消 share 然后按照下面的操作
3. Image Converter 优化图像插入
- 转化图片格式,统一转为 webp,便于图像加载和快速打开
Auto rename自动修改名字根据文章标题,这样后期便于整理static/images不会显得杂乱无章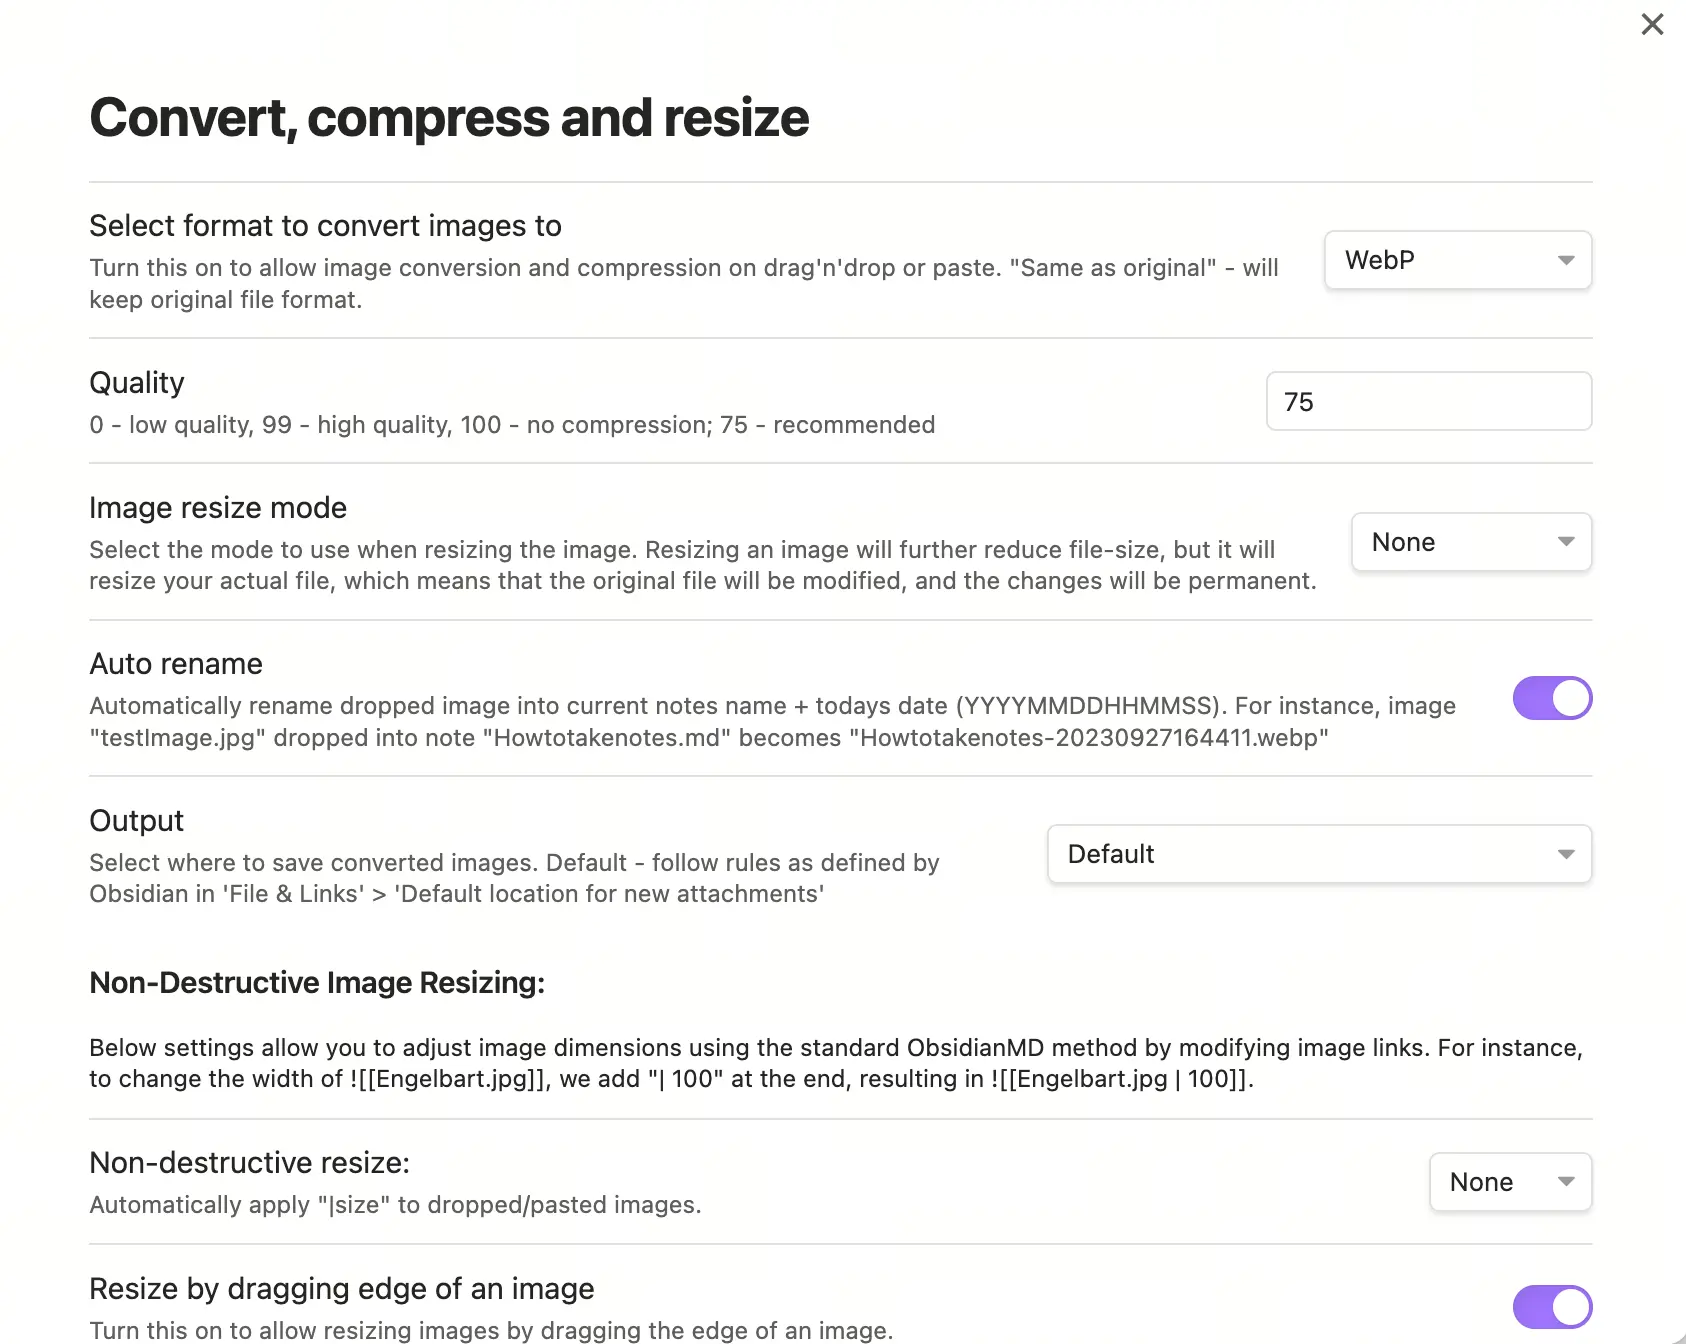
4. Obsidian 文章模板
我在 obsidian 模板里配置的内容,用于发布文章时统一的设置。
我的配置是和 Hugo 强关联的,如果你用了其它工具,就根据自己的情况调整。
- 在设置-模板-模板文件夹位置,设置自己的目标文件夹,我这里设置的是
archetypes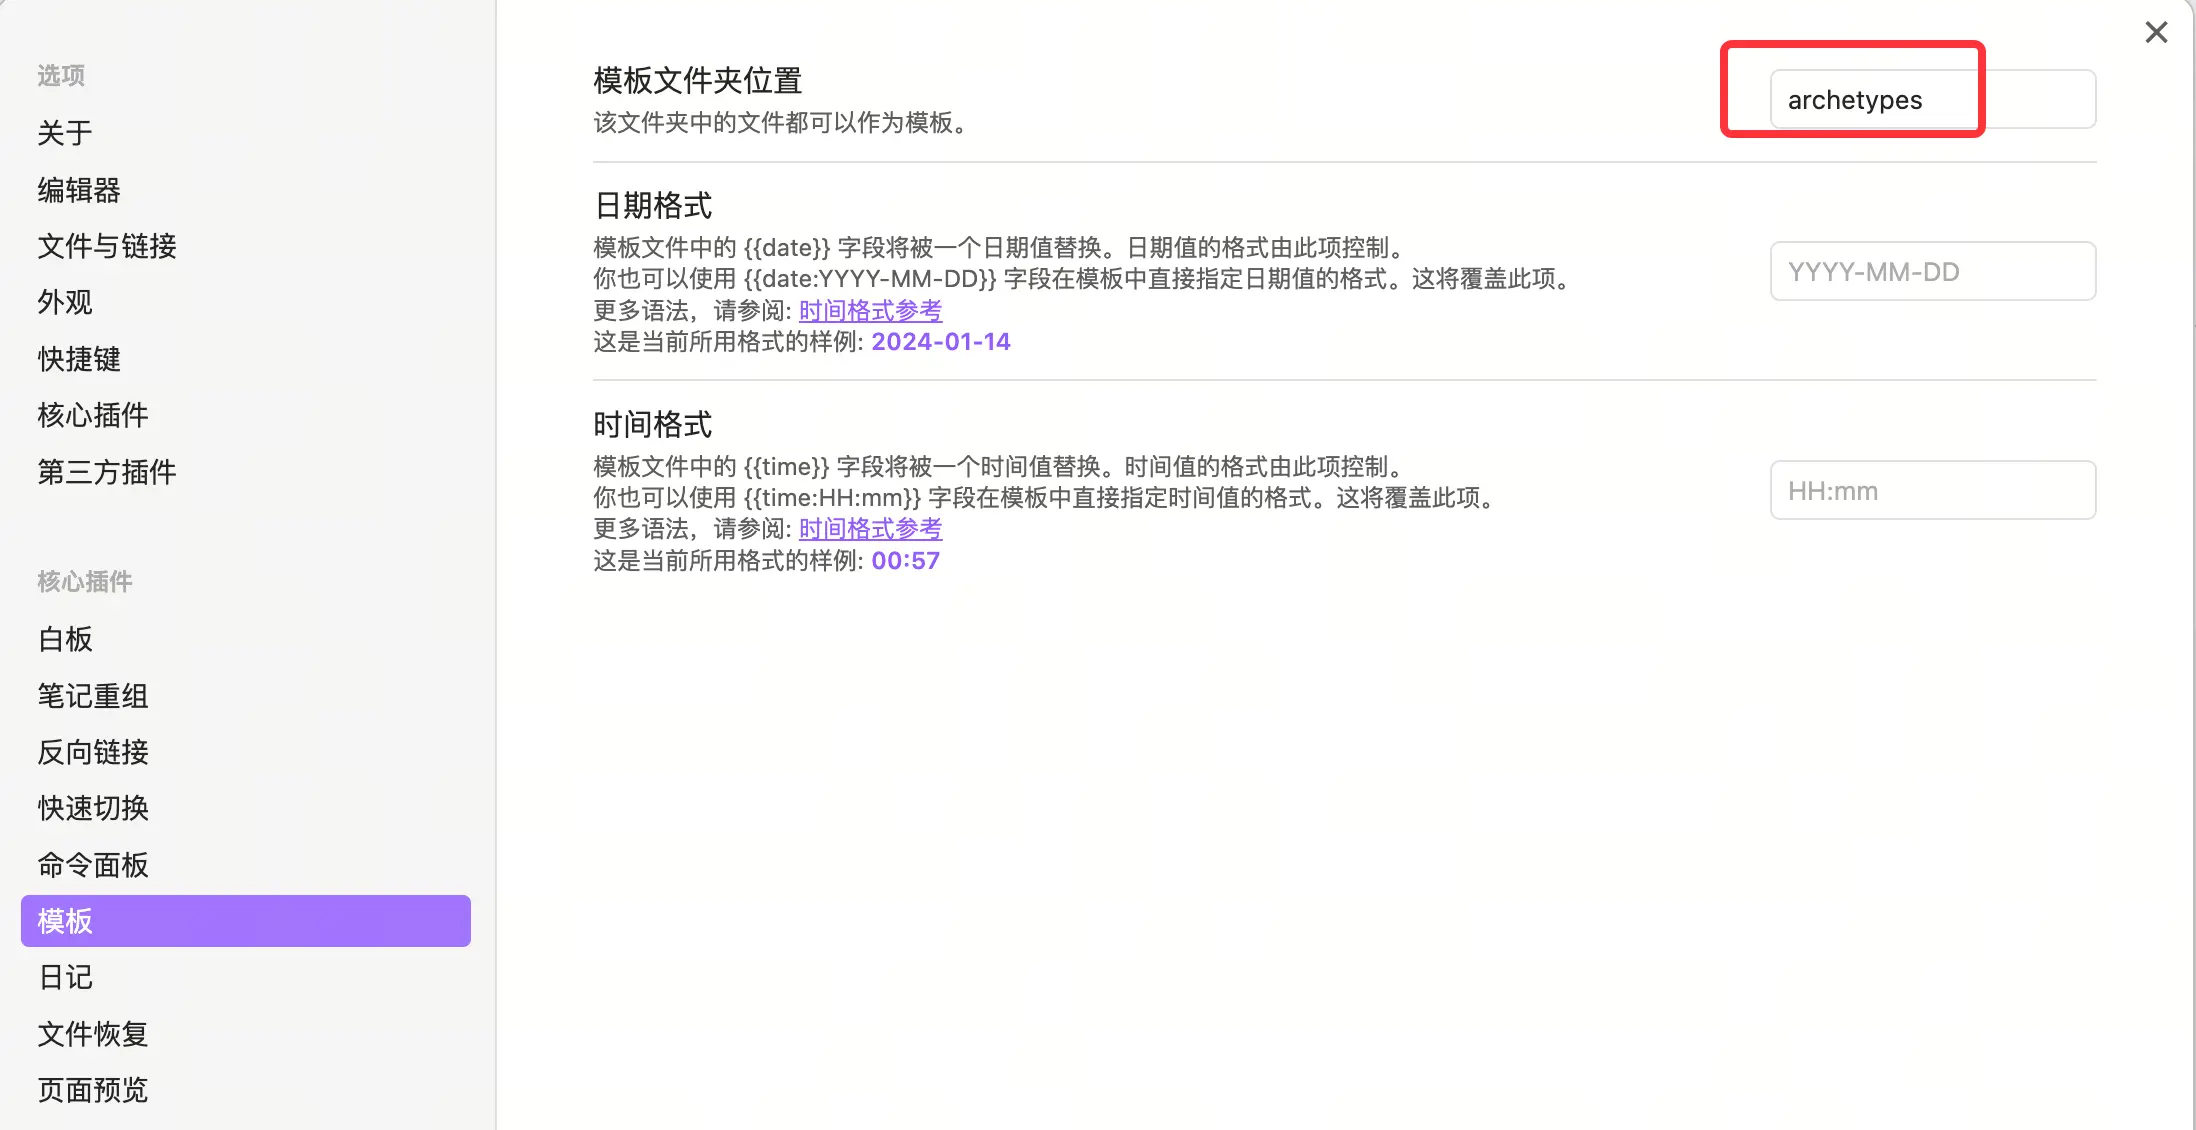
- 在对应的目录新建了一个
post.md作为我文章的默认模板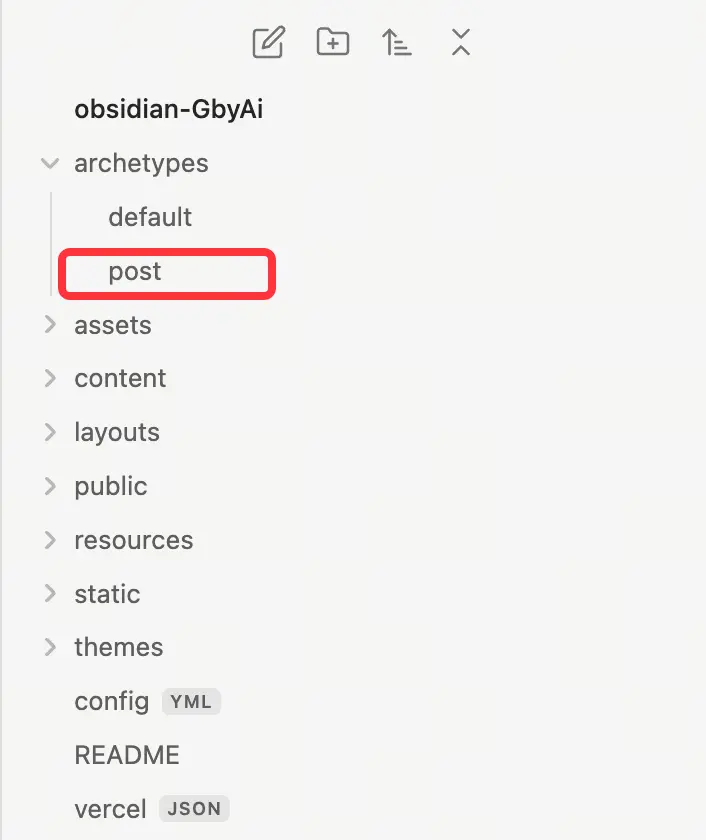
- 模板内容字段解析
---
date: "{{date}}" # 创建时间,我这边生成的格式是 YYYY-MM-DDTHH:mm:ssZ
tags:
- 标签名
title: "{{title}}"
slug:  # 自定义 URL 中文章的访问名称,默认用时间戳填充模板格式为 X
share: false  # 配合 Github Publisher 插件用的,true 表示 obsidian 的文章可以发布
canonicalURL: "" # 之前文章在其他地方被发布的地址,避免搜索引擎重复,设置了该属性会优先展示 canonicalURL 执行的文章
keywords:   # 用于 SEO 优化,也可以不配置该内容默认会使用 tags 的内容
description: "" # 文章的描述 SEO 优化,为空时默认会截取文章前面的内容
series:  # 系列文章
- 系列名
lastmod: # 文章最后更新的时间
lang: "cn" # 默认不用写,配置文件会设置默认 cn 中文,en 英文等等
cover:
  image: /images/post-20240111195047056.webp  # 文章封面图片地址,可以用7牛地址也可以用本地地址
author:  #作者
---
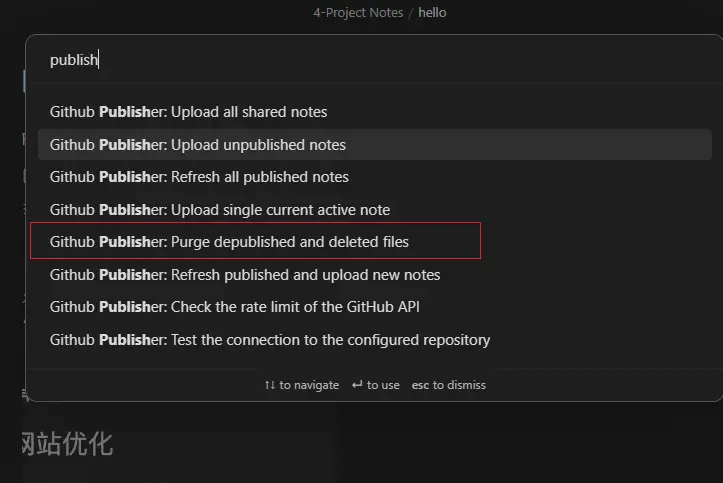
5. 发布新文章
使用命令行
command + P,输入active,然后选择Github Publisher: Uxxxxxxx即可,记着文章的 share 属性要开启,即 true。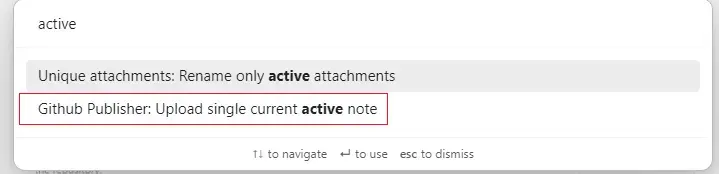
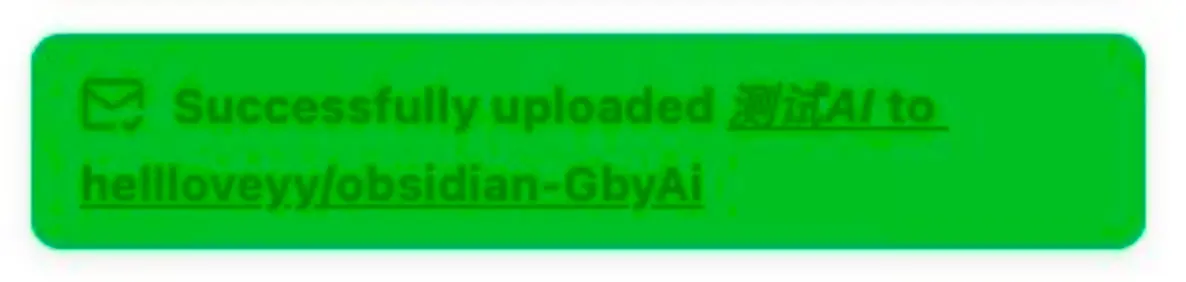
右下角会提示上传的进度,如果完成了右上角有提示:
如果你想上传多个 share 为 true 的文章,使用的命令为:
Refresh published and upload new notes将所有 share 为 true 且新更新的文章发布Refresh all published notes将所有 share 为 true 的文章都发布
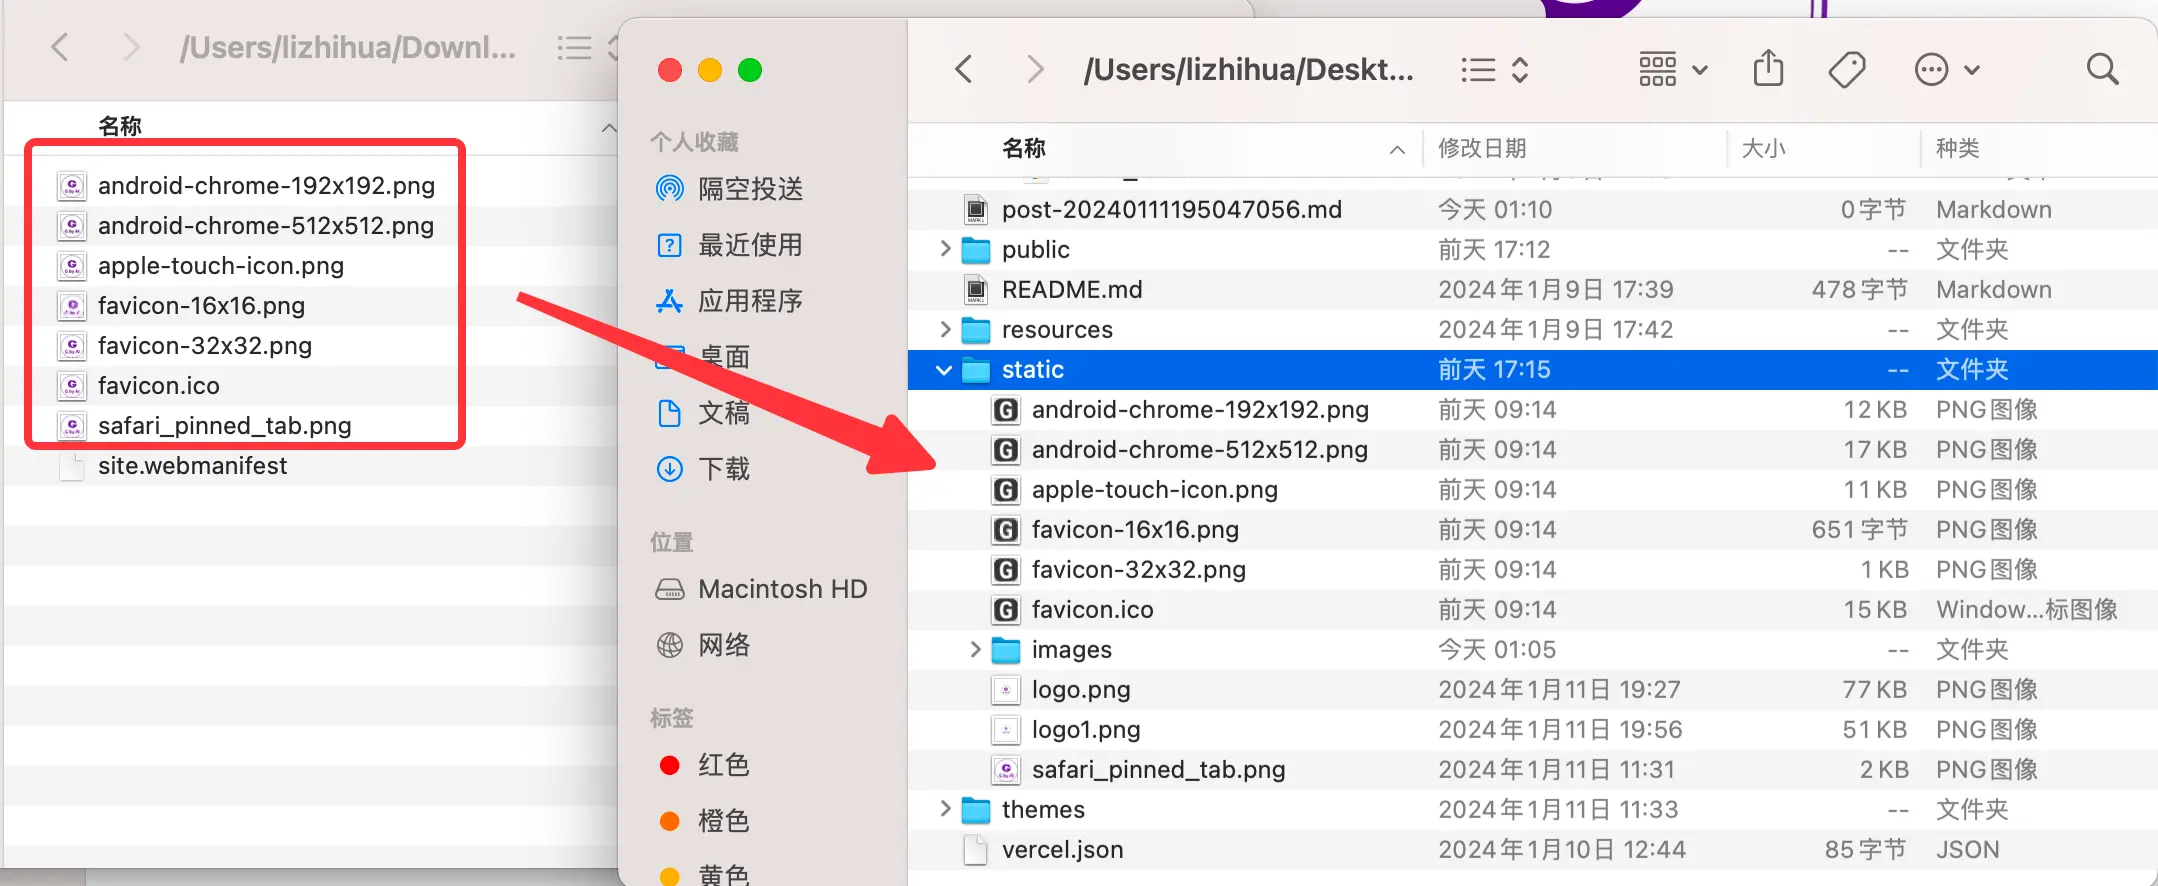
6. Logo & favicon 设计
推荐两个工具:
- 腾讯推出的AI设计Logo工具

- 标小智 这里下载过后直接解压拖动所有文件全部覆盖即可!
7. Vercel 部署
接下来访问 vercel 官网,然后将上面对应的仓库部署上去即可。
1. Github
使用 Github 登录,因为要读取你 GitHub 里面的项目。
在部署之前记得把所有当前的改动都保存推上去哦。
git add -A
git commit -a -m 'first'
git push origin main
2. 创建项目
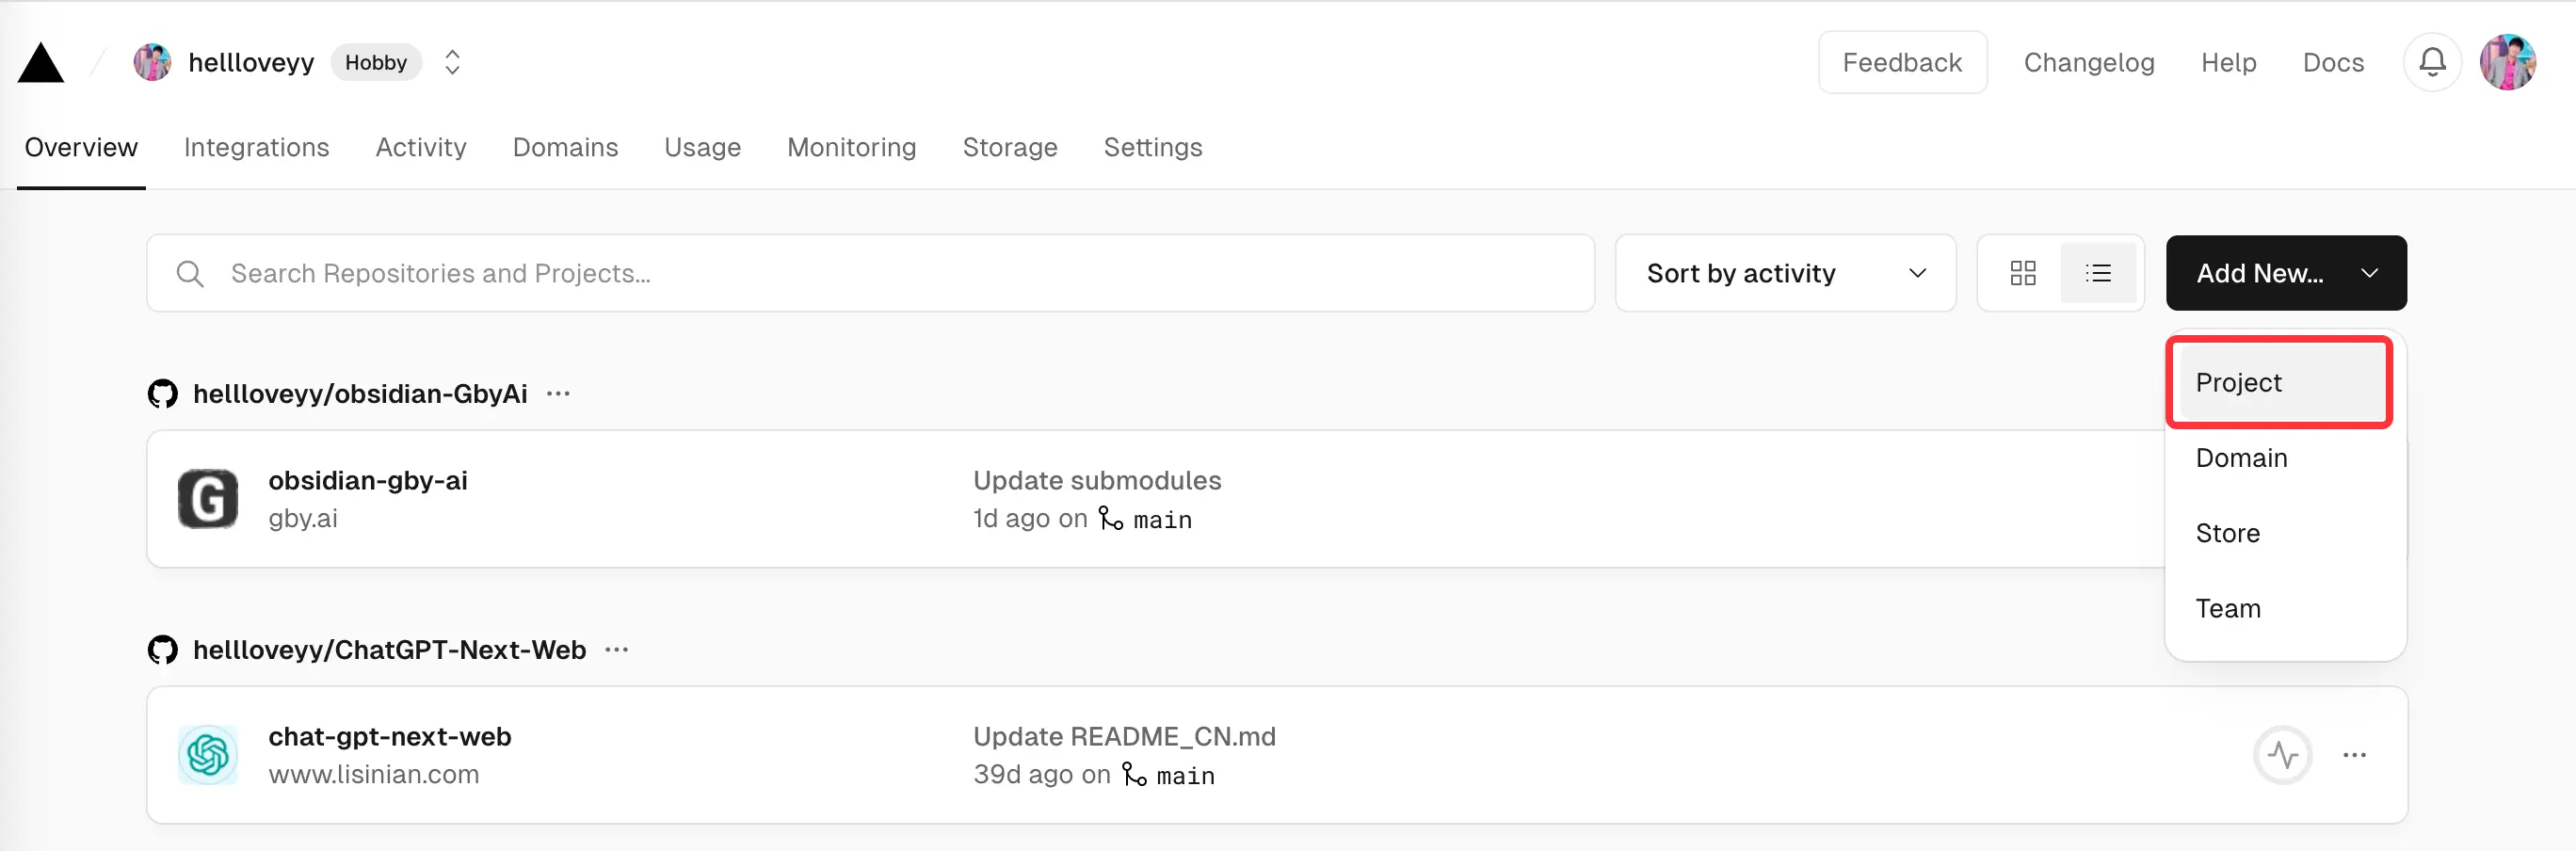
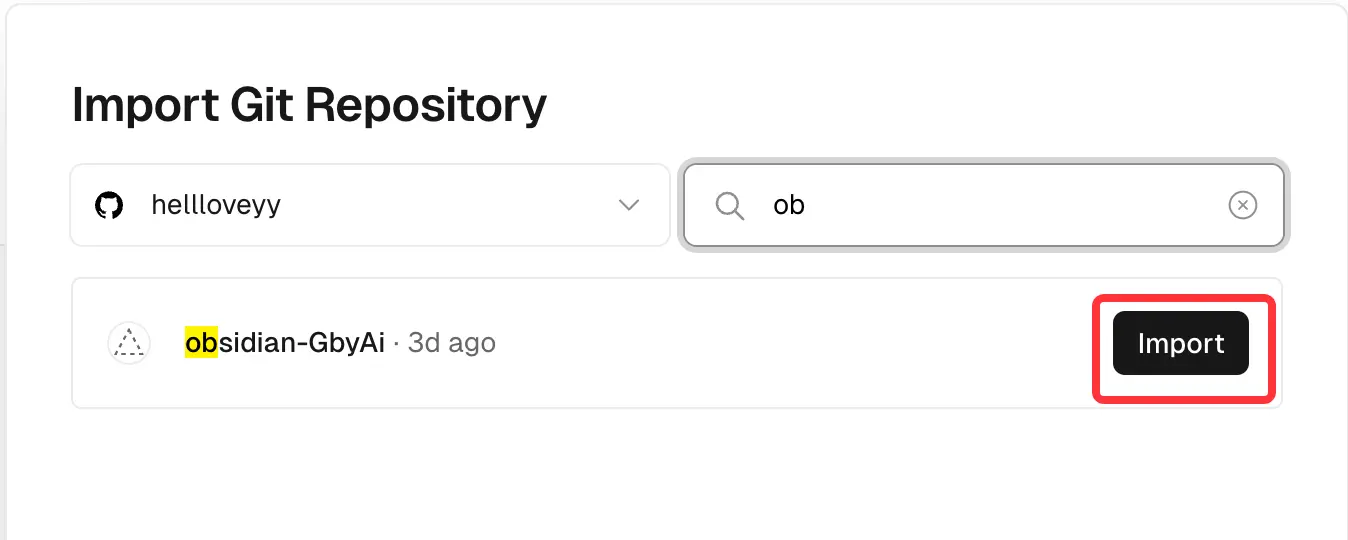
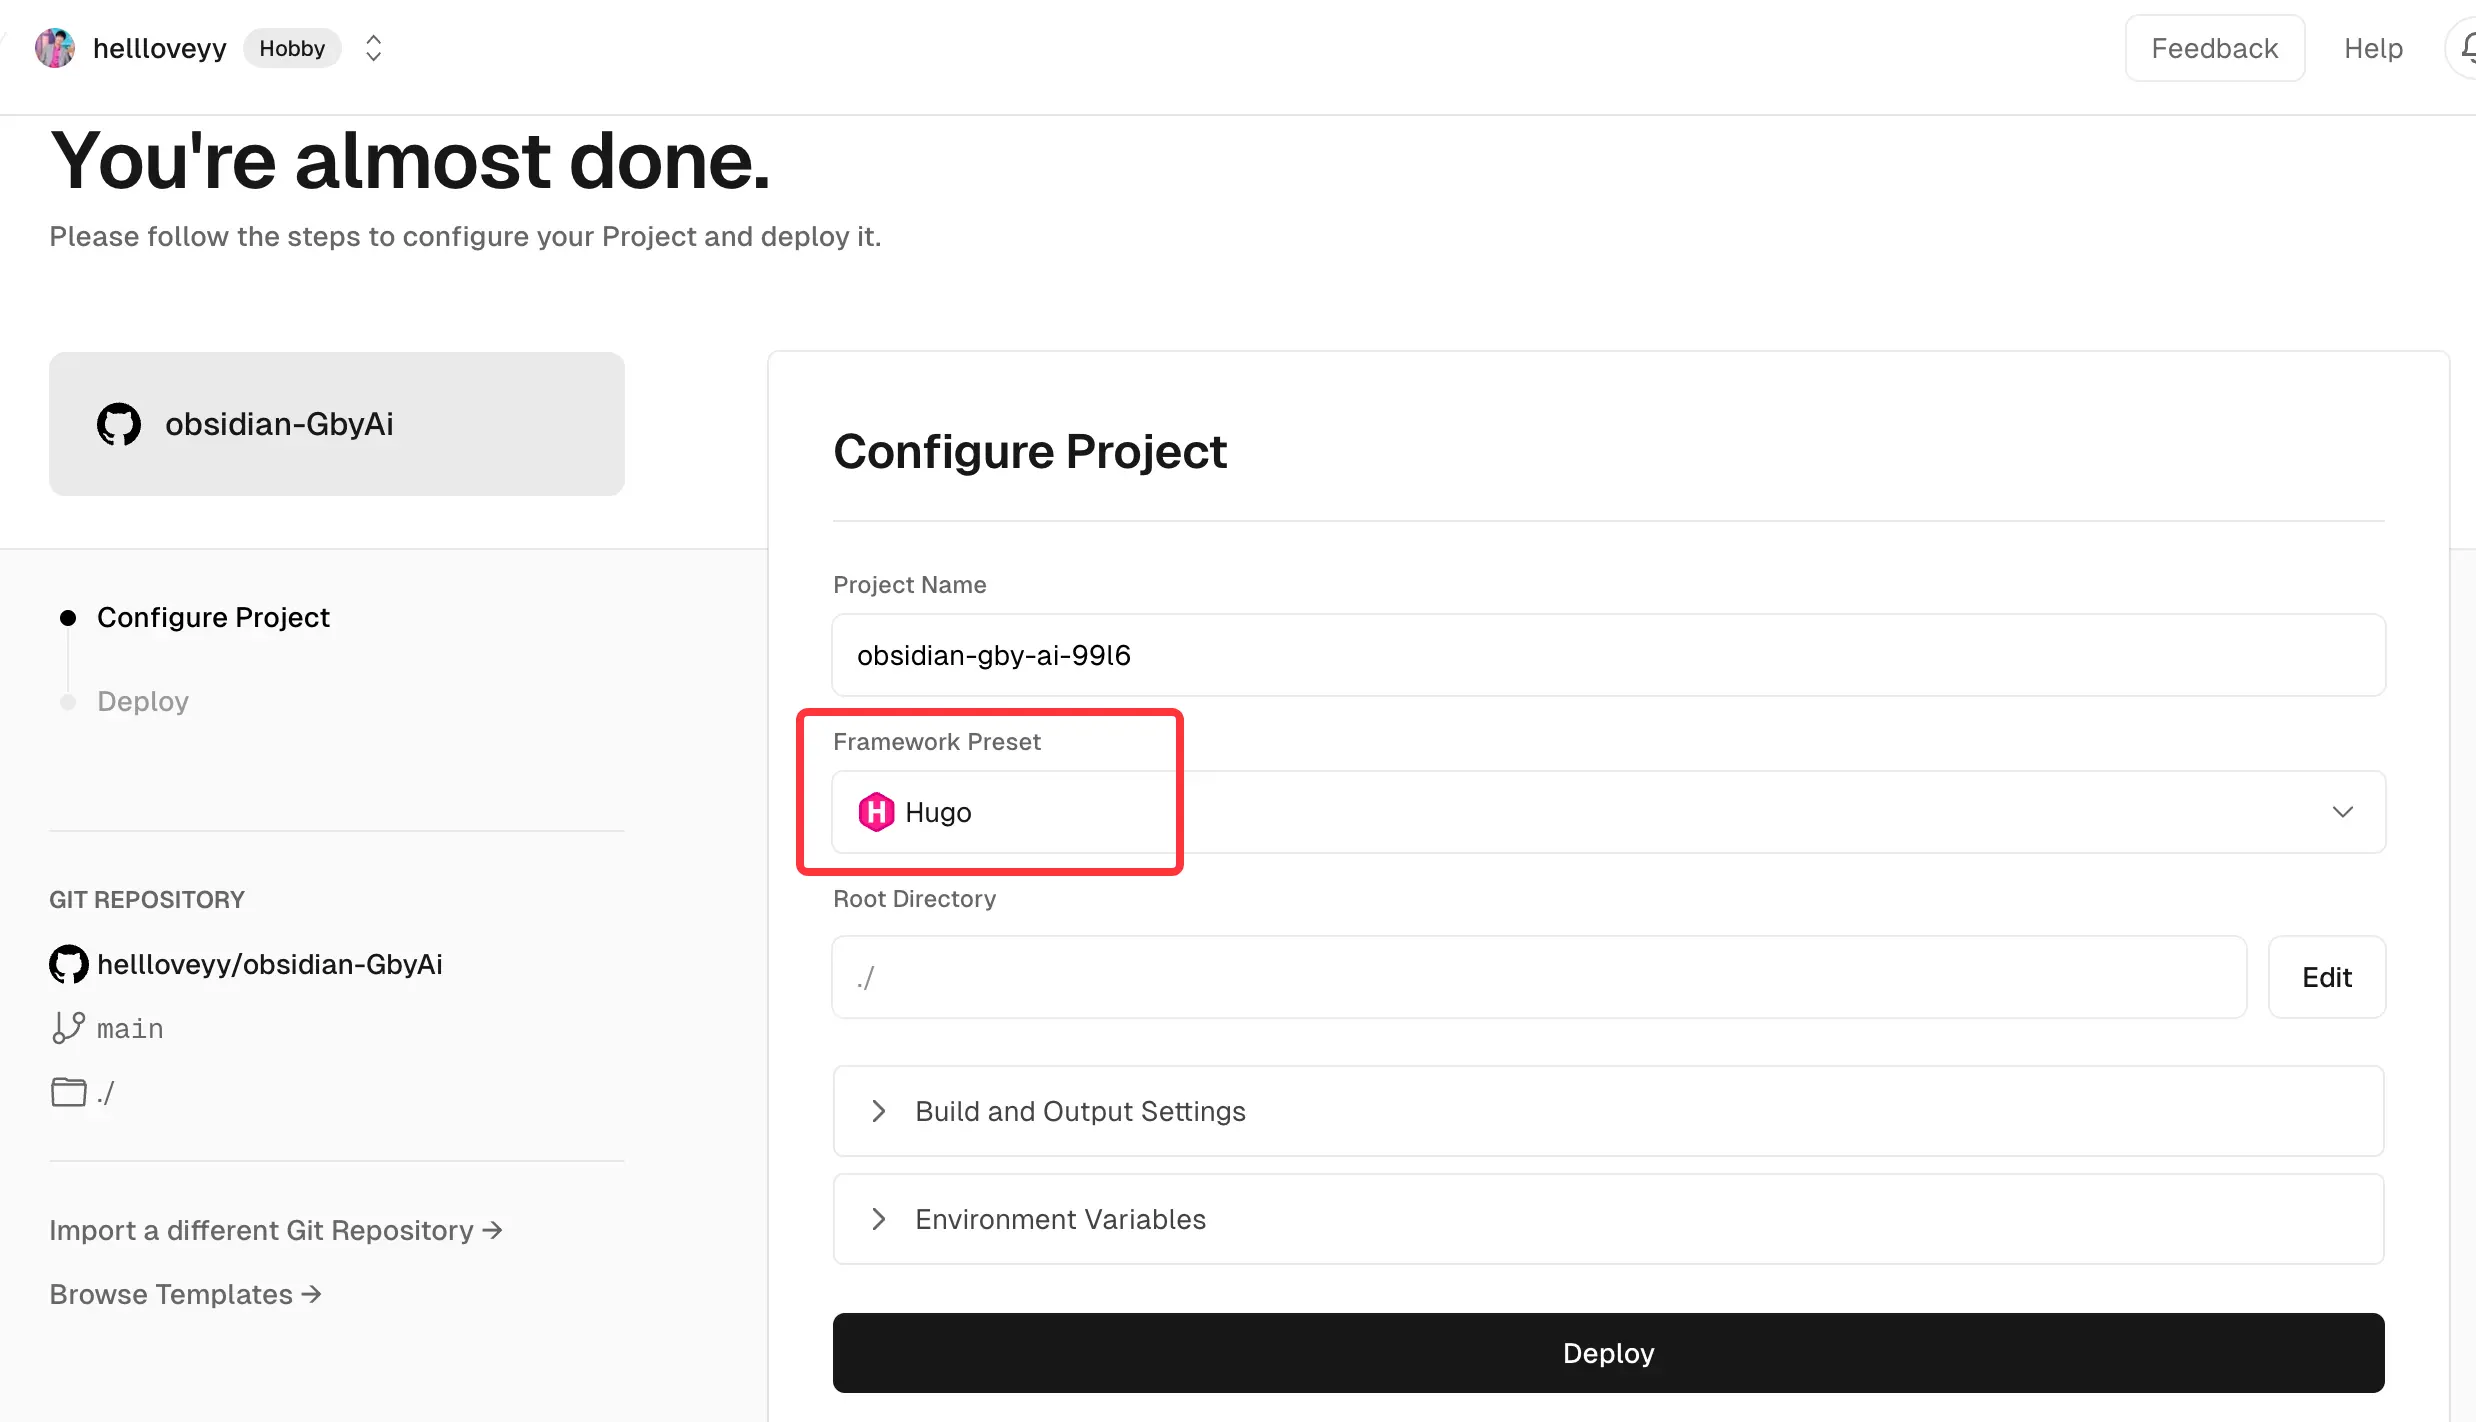
3. Import & Deploy
导入 Github 上 fork 后的项目,import 后再点击 deploy,注意要选择环境 hugo 接下来需要耐心等撒花即可。
4. 域名
完成后点击 Domains,添加自己的域名。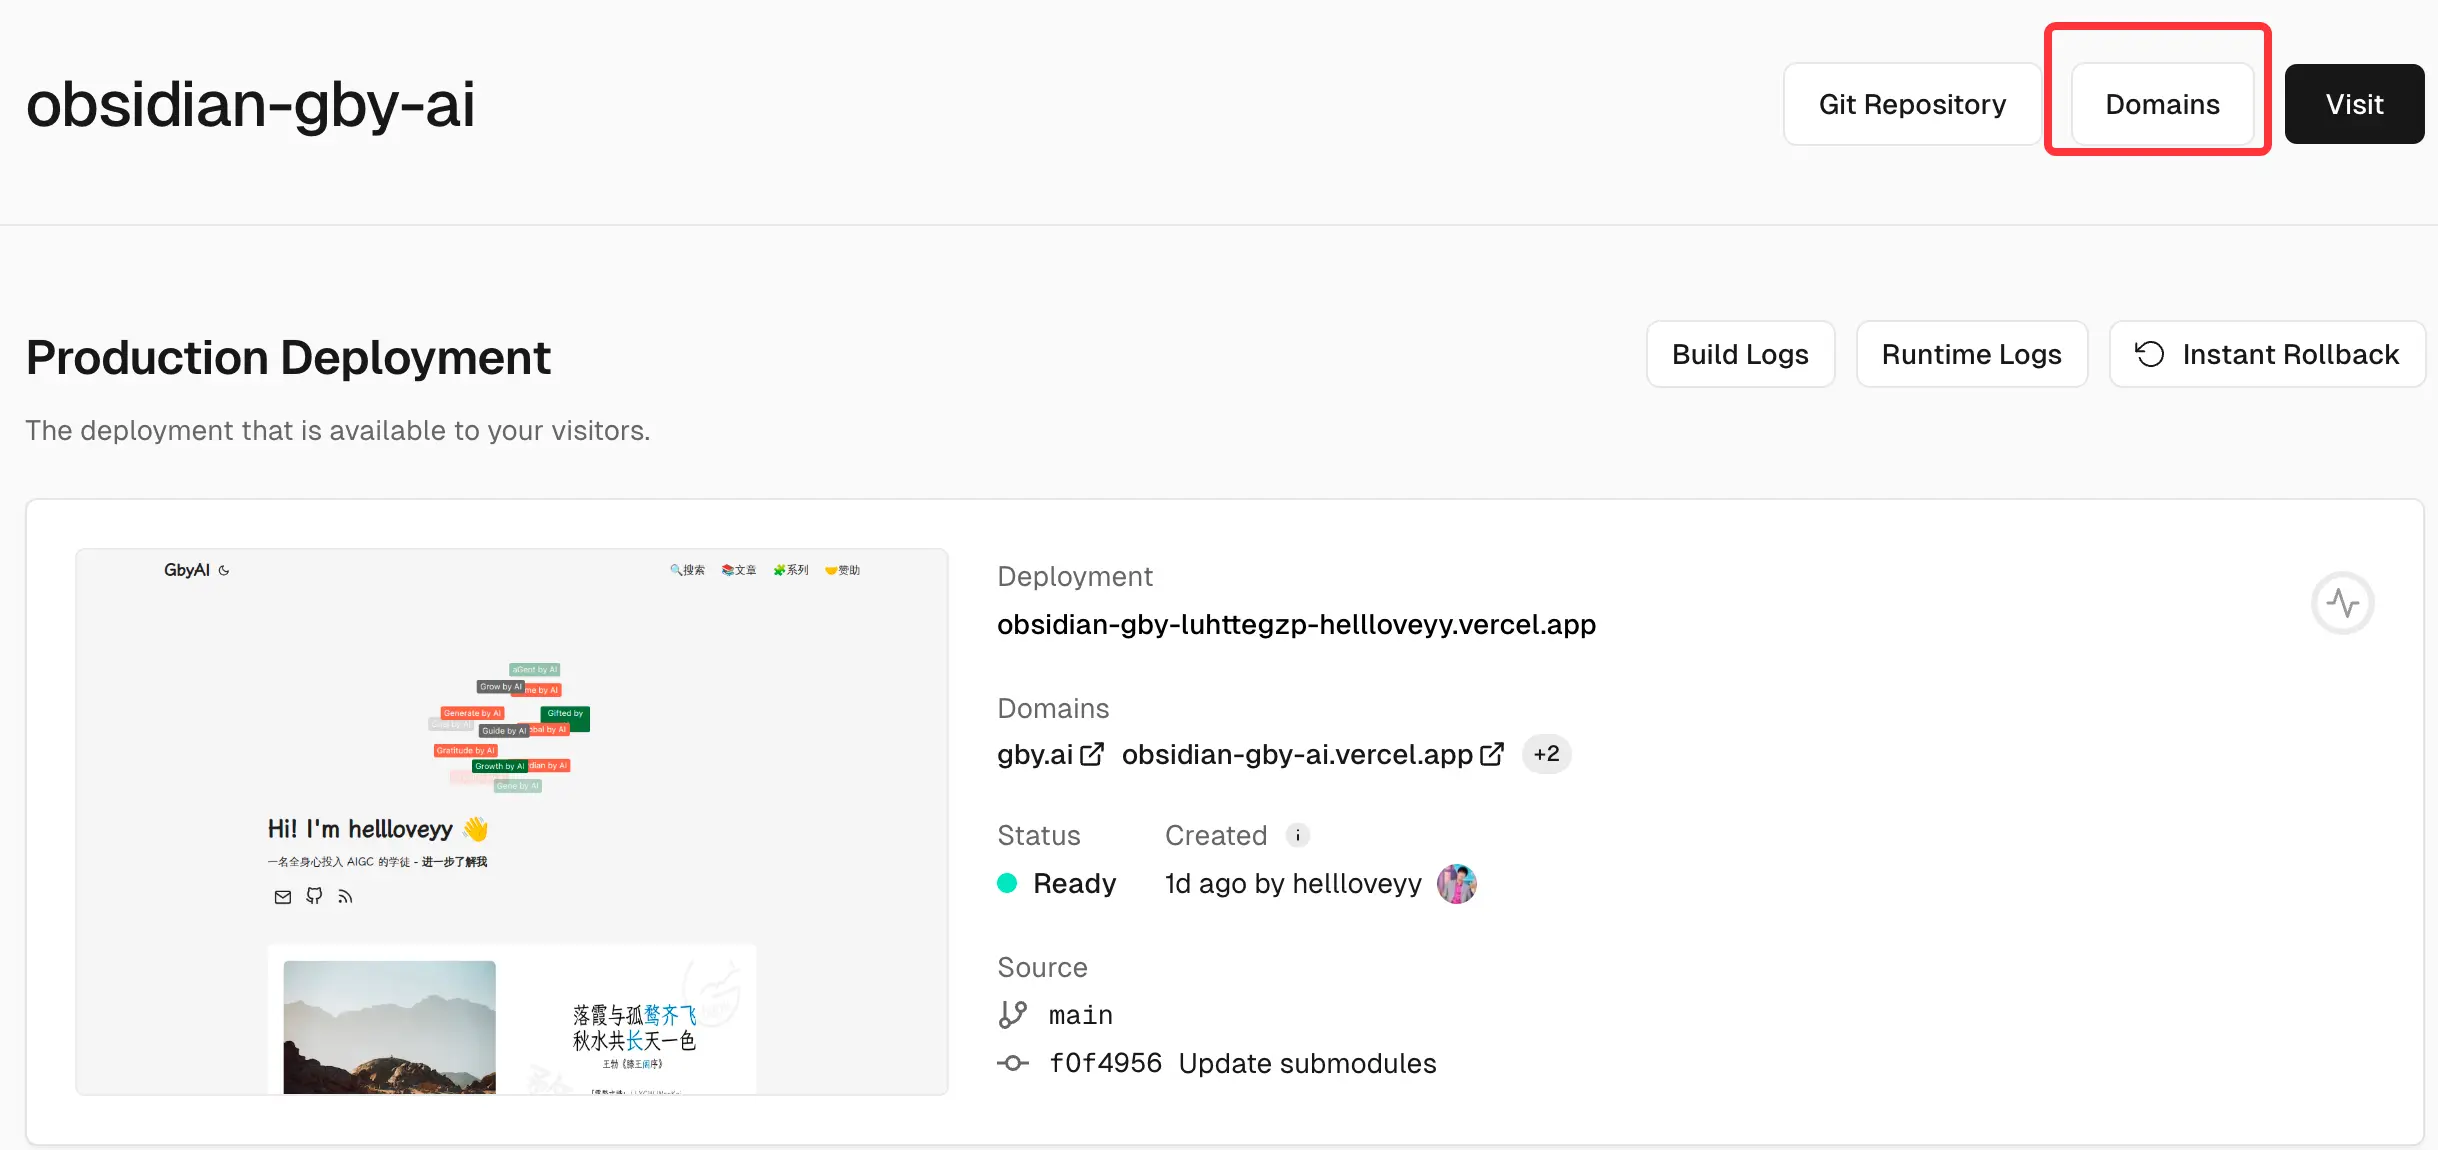
 添加完后,再解析自己的域名,我的域名在 dynadot.com 购买的,按照说明设置即可。Vercel 站上给你分配的域名,网络不太稳定国内访问有时候会受限。
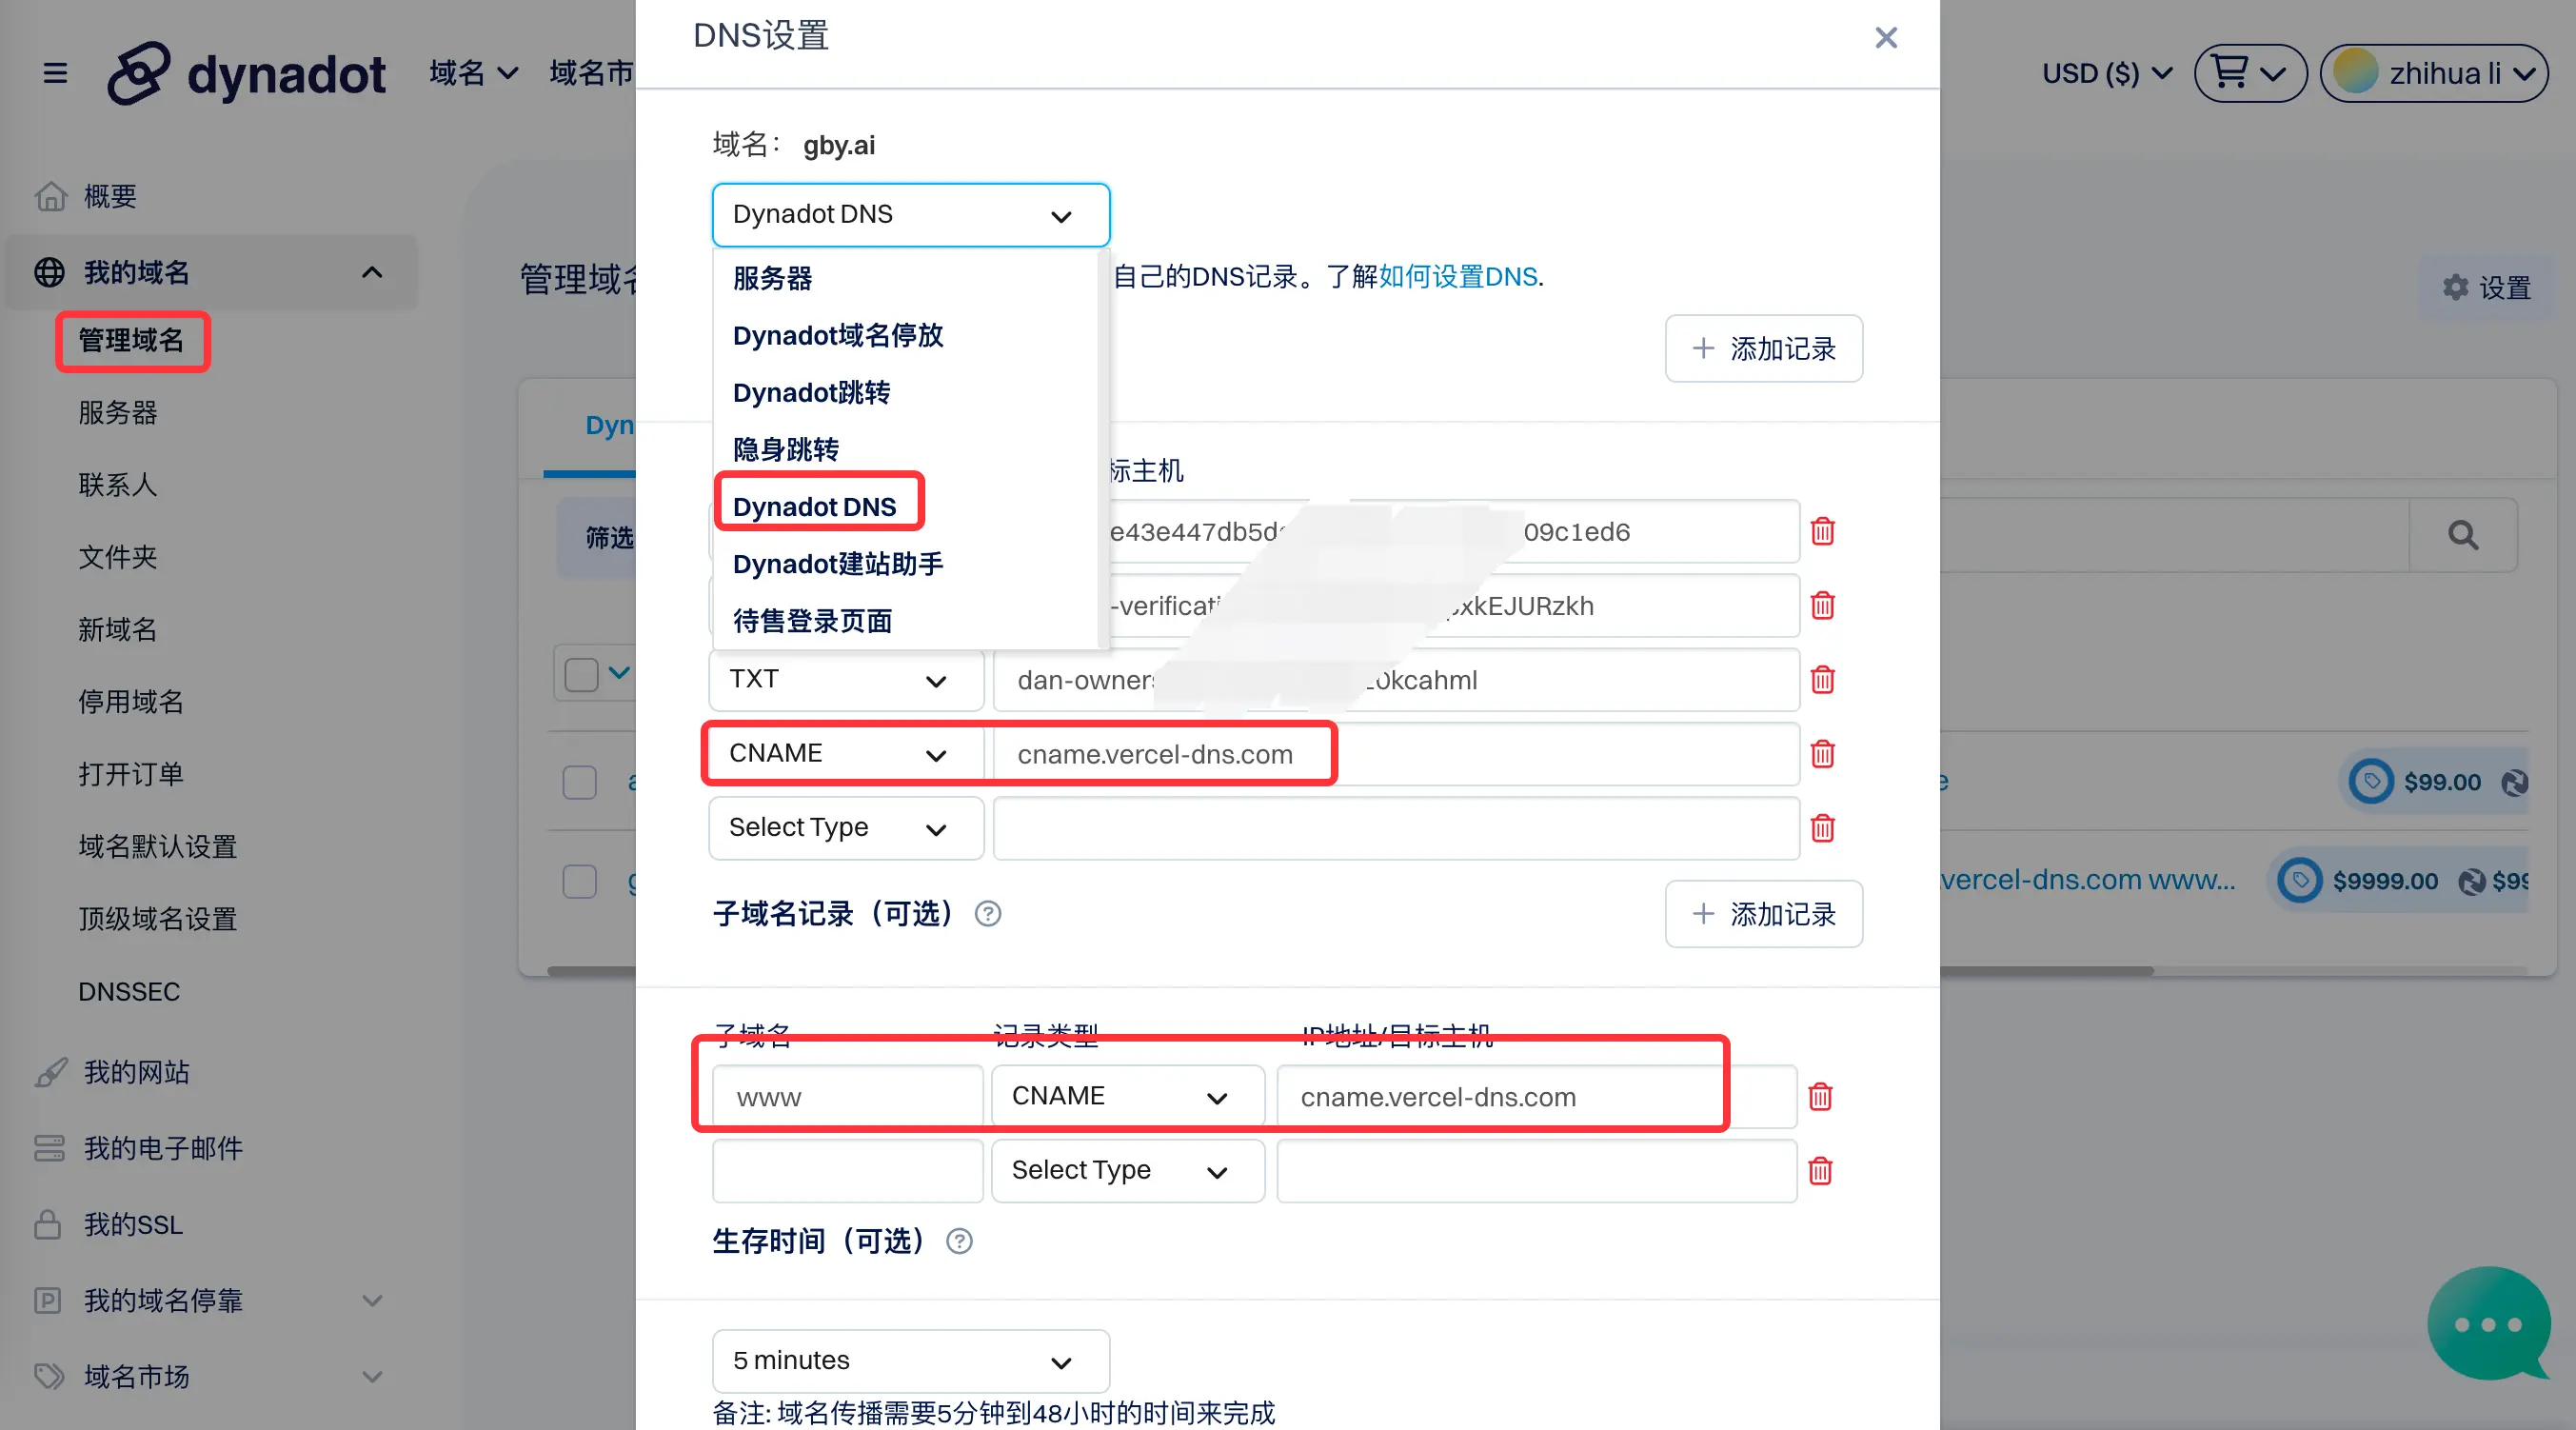
四、总结
生命在于折腾!欢迎以任何方式咨询任何问题,能不能回答到时候再说